You may be required to provide additional measurements after official release.
Basic Measurements
Highlighted measurement(s) might be wrong measured or wrong entered, otherwise please confirm your entrance.
-
-
How to measure Bare Foot Stand Height?
[?]
Take off shoes and remove anything on your head (besides hair). Stand with your back against the wall with your feet together. Make your body as straight as possible.
-
-
How to measure your Weight?
[?]
Remove your shoes and heavy clothing.
-
-
How to measure your Head Breadth?
[?]
We need your head breadth NOT your head circumference.
Step 1:
Stand against a wall and put two books above the top edge of your ears, move closer the books until they tightly reach your head sides. You need someone else to help you.
Step 2:
Now you can walk away from the wall but please keep the books unmoved. Measure the distance between the two books to get your head breadth.
Notice:
- If you have thick hair in the side of your head, you NEED to take it into consideration.
- If you wear eye glasses, you NEED NOT to take them into consideration.
- Take several measurements to see if you get the same results and to make sure you have done it correctly.
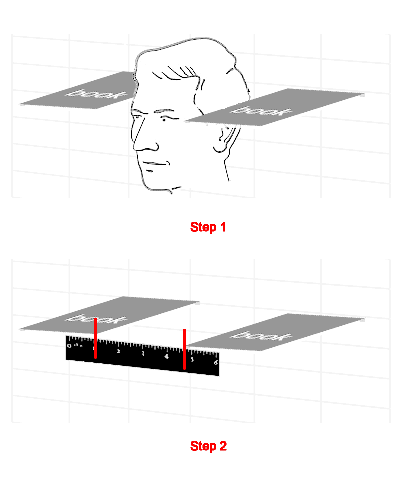
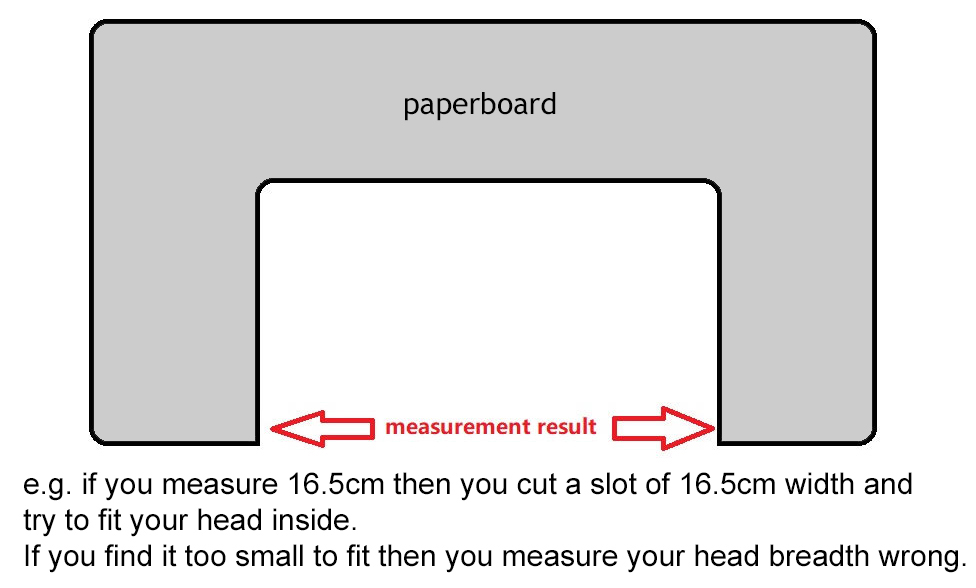
You can also make sure the measurement with a paperboard. Simply cut a slot on it with the same width with the measurement result, and if it can be fit on your head it means the measurement is correct.
-
-
Body circumference
[?]
Neck Circumference
There are two methods of determining your neck circumference: �Method 1: Simply measure the circumference around the thickest part of your neck as indicated on the diagram. �Method 2: Measure around the lower part of the neck.
Chest Circumference
Place a tape measure under your armpits and put it around the fullest part of your chest. Make sure the tape measure isn't too loose or too tight.
Waist Circumference
Put a tape measure around your BELLY BUTTON. Don’t suck your stomach. Make sure the tape measure isn't too loose or too tight.
Hip Circumference
Wrap the tape measure around the WIDEST part of your hips and make sure it isn't too loose or too tight.
Thigh Circumference
Do this measurement as high up your thigh as possible. Wrap the tape measure around ONE of your thigh. Make sure the tape measure isn't too loose or too tight.
Calf Circumference
Do this measurement around the widest part of your calf as indicated by the red line in the diagram. Wrap the tape measure around ONE of your calf. Make sure the tape measure isn't too loose or too tight.
Axillary Arm Circumference
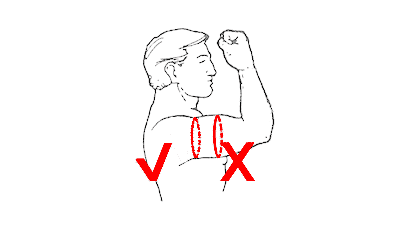
Wrap the tape measure around your arm above the bicep and underneath the axilla or armpit and make sure it isn't too loose or too tight.

-
-
Body circumference
[?]
Neck Circumference
There are two methods of determining your neck circumference: �Method 1: Simply measure the circumference around the thickest part of your neck as indicated on the diagram. �Method 2: Measure around the lower part of the neck.
Chest Circumference
Place a tape measure under your armpits and put it around the fullest part of your chest. Make sure the tape measure isn't too loose or too tight.
Waist Circumference
Put a tape measure around your BELLY BUTTON. Don’t suck your stomach. Make sure the tape measure isn't too loose or too tight.
Hip Circumference
Wrap the tape measure around the WIDEST part of your hips and make sure it isn't too loose or too tight.
Thigh Circumference
Do this measurement as high up your thigh as possible. Wrap the tape measure around ONE of your thigh. Make sure the tape measure isn't too loose or too tight.
Calf Circumference
Do this measurement around the widest part of your calf as indicated by the red line in the diagram. Wrap the tape measure around ONE of your calf. Make sure the tape measure isn't too loose or too tight.
Axillary Arm Circumference
Wrap the tape measure around your arm above the bicep and underneath the axilla or armpit and make sure it isn't too loose or too tight.


-
-
Body circumference
[?]
Neck Circumference
There are two methods of determining your neck circumference: �Method 1: Simply measure the circumference around the thickest part of your neck as indicated on the diagram. �Method 2: Measure around the lower part of the neck.
Chest Circumference
Place a tape measure under your armpits and put it around the fullest part of your chest. Make sure the tape measure isn't too loose or too tight.
Waist Circumference
Put a tape measure around your BELLY BUTTON. Don’t suck your stomach. Make sure the tape measure isn't too loose or too tight.
Hip Circumference
Wrap the tape measure around the WIDEST part of your hips and make sure it isn't too loose or too tight.
Thigh Circumference
Do this measurement as high up your thigh as possible. Wrap the tape measure around ONE of your thigh. Make sure the tape measure isn't too loose or too tight.
Calf Circumference
Do this measurement around the widest part of your calf as indicated by the red line in the diagram. Wrap the tape measure around ONE of your calf. Make sure the tape measure isn't too loose or too tight.
Axillary Arm Circumference
Wrap the tape measure around your arm above the bicep and underneath the axilla or armpit and make sure it isn't too loose or too tight.


-
-
Body circumference
[?]
Neck Circumference
There are two methods of determining your neck circumference: �Method 1: Simply measure the circumference around the thickest part of your neck as indicated on the diagram. �Method 2: Measure around the lower part of the neck.
Chest Circumference
Place a tape measure under your armpits and put it around the fullest part of your chest. Make sure the tape measure isn't too loose or too tight.
Waist Circumference
Put a tape measure around your BELLY BUTTON. Don’t suck your stomach. Make sure the tape measure isn't too loose or too tight.
Hip Circumference
Wrap the tape measure around the WIDEST part of your hips and make sure it isn't too loose or too tight.
Thigh Circumference
Do this measurement as high up your thigh as possible. Wrap the tape measure around ONE of your thigh. Make sure the tape measure isn't too loose or too tight.
Calf Circumference
Do this measurement around the widest part of your calf as indicated by the red line in the diagram. Wrap the tape measure around ONE of your calf. Make sure the tape measure isn't too loose or too tight.
Axillary Arm Circumference
Wrap the tape measure around your arm above the bicep and underneath the axilla or armpit and make sure it isn't too loose or too tight.


-
-
Body circumference
[?]
Neck Circumference
There are two methods of determining your neck circumference: �Method 1: Simply measure the circumference around the thickest part of your neck as indicated on the diagram. �Method 2: Measure around the lower part of the neck.
Chest Circumference
Place a tape measure under your armpits and put it around the fullest part of your chest. Make sure the tape measure isn't too loose or too tight.
Waist Circumference
Put a tape measure around your BELLY BUTTON. Don’t suck your stomach. Make sure the tape measure isn't too loose or too tight.
Hip Circumference
Wrap the tape measure around the WIDEST part of your hips and make sure it isn't too loose or too tight.
Thigh Circumference
Do this measurement as high up your thigh as possible. Wrap the tape measure around ONE of your thigh. Make sure the tape measure isn't too loose or too tight.
Calf Circumference
Do this measurement around the widest part of your calf as indicated by the red line in the diagram. Wrap the tape measure around ONE of your calf. Make sure the tape measure isn't too loose or too tight.
Axillary Arm Circumference
Wrap the tape measure around your arm above the bicep and underneath the axilla or armpit and make sure it isn't too loose or too tight.


-
-
Body circumference
[?]
Neck Circumference
There are two methods of determining your neck circumference: �Method 1: Simply measure the circumference around the thickest part of your neck as indicated on the diagram. �Method 2: Measure around the lower part of the neck.
Chest Circumference
Place a tape measure under your armpits and put it around the fullest part of your chest. Make sure the tape measure isn't too loose or too tight.
Waist Circumference
Put a tape measure around your BELLY BUTTON. Don’t suck your stomach. Make sure the tape measure isn't too loose or too tight.
Hip Circumference
Wrap the tape measure around the WIDEST part of your hips and make sure it isn't too loose or too tight.
Thigh Circumference
Do this measurement as high up your thigh as possible. Wrap the tape measure around ONE of your thigh. Make sure the tape measure isn't too loose or too tight.
Calf Circumference
Do this measurement around the widest part of your calf as indicated by the red line in the diagram. Wrap the tape measure around ONE of your calf. Make sure the tape measure isn't too loose or too tight.
Axillary Arm Circumference
Wrap the tape measure around your arm above the bicep and underneath the axilla or armpit and make sure it isn't too loose or too tight.


-
-
Body circumference
[?]
Neck Circumference
There are two methods of determining your neck circumference: �Method 1: Simply measure the circumference around the thickest part of your neck as indicated on the diagram. �Method 2: Measure around the lower part of the neck.
Chest Circumference
Place a tape measure under your armpits and put it around the fullest part of your chest. Make sure the tape measure isn't too loose or too tight.
Waist Circumference
Put a tape measure around your BELLY BUTTON. Don’t suck your stomach. Make sure the tape measure isn't too loose or too tight.
Hip Circumference
Wrap the tape measure around the WIDEST part of your hips and make sure it isn't too loose or too tight.
Thigh Circumference
Do this measurement as high up your thigh as possible. Wrap the tape measure around ONE of your thigh. Make sure the tape measure isn't too loose or too tight.
Calf Circumference
Do this measurement around the widest part of your calf as indicated by the red line in the diagram. Wrap the tape measure around ONE of your calf. Make sure the tape measure isn't too loose or too tight.
Axillary Arm Circumference
Wrap the tape measure around your arm above the bicep and underneath the axilla or armpit and make sure it isn't too loose or too tight.


-
-
Shoe Size Chart
[?]
The shoe armors have a pair of built-in shoes.
The shoe armors have 5 sizes (S, M, L, XL and XXL) corresponding to your normal shoes size.
Notice:
If your shoes have different sizes, the small size shall prevail (For example, if you wear shoes of size 42 and 43, your shoe size is “M”).
| Size | EU | US | CA | UK | AU | MX | JP |
|---|
| |
|
|
|
|
|
|
|
| S |
<=37 |
|
|
|
|
|
|
| 37 |
5.5 |
5.5 |
5 |
|
- |
23.5 |
| 38 |
6 |
6 |
5.5 |
|
25 |
24 |
| 39 |
6.5 - 7.0 |
6.5 - 7.0 |
6 - 6.5 |
|
- |
24.5 |
| M |
40 |
7.5 |
7.5 |
7 |
|
26 |
25-25.5 |
| 41 |
8 |
8 |
7.5 |
|
27 |
26 |
| 42 |
8.5 |
8.5 |
8 |
8.5 |
28 |
26.5-27 |
| L |
43 |
9 - 9.5 |
9 - 9.5 |
8.5 - 9 |
9 |
29 |
27.5-28 |
| 44 |
10 |
10 |
9.5 |
10.5 |
30 |
28.5 |
| XL |
45 |
10.5 - 11 |
10.5 - 11 |
10 - 10.5 |
11.5 |
- |
29 |
| 46 |
11.5 |
11.5 |
11.5 |
12 |
31 |
30 |
| XXL |
47 |
12.5 |
12.5 |
12.5 |
12.5 - 13 |
32 |
31 |
| >=47 |
|
|
|
|
|
|
-
-
How to measure your Little finger length?
[?]
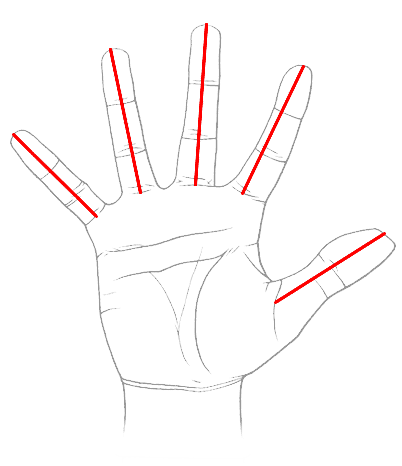
Please measure from the tip of your each finger to where the finger connects to the palm of your hand (specifically, measure to the crease between palm and finger, indicated on the diagram).
-
-
How to measure your Ring finger length?
[?]
Please measure from the tip of your each finger to where the finger connects to the palm of your hand (specifically, measure to the crease between palm and finger, indicated on the diagram).
For thumb finger length best results:
- Use a straight edge, solid ruler not a measuring tape Let your thumb finger curl naturally
- Fine the crease between Palm and thumb as indicated on diagram
- Start your measurement at the crease by placing the start of the ruler at the indicated crease
- Straighten your thumb along the ruler
- Determine and record the length of your thumb

-
-
How to measure your Middle finger length?
[?]
Please measure from the tip of your each finger to where the finger connects to the palm of your hand (specifically, measure to the crease between palm and finger, indicated on the diagram).
For thumb finger length best results:
- Use a straight edge, solid ruler not a measuring tape Let your thumb finger curl naturally
- Fine the crease between Palm and thumb as indicated on diagram
- Start your measurement at the crease by placing the start of the ruler at the indicated crease
- Straighten your thumb along the ruler
- Determine and record the length of your thumb

-
-
How to measure your Index finger length?
[?]
Please measure from the tip of your each finger to where the finger connects to the palm of your hand (specifically, measure to the crease between palm and finger, indicated on the diagram).
For thumb finger length best results:
- Use a straight edge, solid ruler not a measuring tape Let your thumb finger curl naturally
- Fine the crease between Palm and thumb as indicated on diagram
- Start your measurement at the crease by placing the start of the ruler at the indicated crease
- Straighten your thumb along the ruler
- Determine and record the length of your thumb

-
-
How to measure your Thumb finger length?
[?]
Please measure from the tip of your each finger to where the finger connects to the palm of your hand (specifically, measure to the crease between palm and finger, indicated on the diagram).
For thumb finger length best results:
- Use a straight edge, solid ruler not a measuring tape Let your thumb finger curl naturally
- Fine the crease between Palm and thumb as indicated on diagram
- Start your measurement at the crease by placing the start of the ruler at the indicated crease
- Straighten your thumb along the ruler
- Determine and record the length of your thumb

-
-
How to measure your Palm width?
[?]
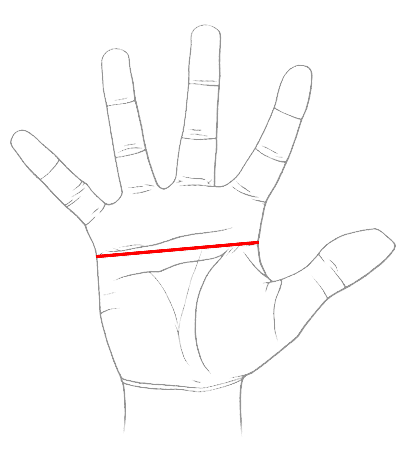
Please measure across the widest part of your palm (between the starting points of the palm print). These point can best be determined by the using the natural lines on your hands as reference points as indicated by the line highlighted in the diagram. To see these lines clearly, relax your hand while measuring.
