has option

Availability: In stock

$5,999
Advance payment $500
Payment plans

After you place your order, we will email you for the payment plan and then send you the first invoice. If you do not receive any email within 24 hours, please check your spam mailbox or email us administrator@buyfullbodyarmors.com

Expected Ship Date:
Customize & Buy
↑ top

1:1 life-size wearable Iron Man Mark 43 (XLIII) suit costume is made-to-measure and custom made according to your add-on choices.


About Preorders

Pre-order now and get 200 USD discount.

We are now upgrading the Iron Man Mark 43.

  • Painting technique will be upgraded to the standard of Mark 47 and Mark 46
  • Armored pieces will be re-segmented to provide better durability and better wearing experience
  • Electronic system will be upgraded to support external power supply
  • Motorized add-ons will be more stable and more movie-accurate

The current photos and videos you see on this webpage were shot with the old version of the Mark 43. Photos and videos of the upgraded Mark 43 will be shot in October 2020.

Description

Details & Dimensions

  • Armor material: Polyurethane (PU) Plastic, ABS Plastic, aluminum alloy framework
  • Harness material: nylon straps, nylon plugs, Velcro hooks and loops
  • Painting: primer, color paint, high-gloss protection paint
  • Armor size: wearable 1:1 life-size, made to measure
  • Armor weight: around 15.4 lbs (7 kg), varies depending on your add-ons and accessories choice
  • Shipment size: approximate Height: 14.6" (37 cm) | Width: 41.7" (106 cm) | Depth: 18.5" (47 cm), varies depending on your measurements
  • Shipment weight: approximate 66 lbs (30 kg), varies depending on your add-ons and accessories choice


Shipping

  • Ships to North America 449 USD by Air Express
  • Ships to Other countries and regions from 499 USD to 699 USD by Air Express


Delivery

  • North America, most of the European countries: 4 to 10 business days
  • South America, Australia, Asia, Africa, other countries and regions: 6 to 12 business days

Rush delivery available


Price List

Basic Suit

  • Basic Mark 43 armor (with no add-ons nor accessories), 5,999 USD

Basic Add-ons

  • Motorized face plate and eye lights, 249 USD
  • Ultra-refined chest Arc Reactor, 349 USD
  • Ultra-refined hand Repulsors with sound effect, 349 USD

Advanced Add-ons

  • Forearm Missile, both arms, 599 USD, only left or right forearm, 299 USD
  • Motorized back wing flaps, 799 USD
  • Carbon Dioxide (CO2) propulsion simulators (must have the motorized back wing flaps), 499 USD
  • Blue lights under the chest armor, 99 USD
  • Ultra-refined shoe bottom Repulsors with walking sound effect, 299 USD
  • Ventilation cooling system, 99 USD
  • Voice changer, 99 USD

Accessories

  • Spandex body suit + Height-increasing shoe insoles, 99 USD

Stands for storage and exhibition

  • Universal Aluminium Alloy Stand (UAAS) [black color], 649 USD
  • Universal Aluminium Alloy Stand (UAAS) [original Aluminium color], 549 USD


Videos

Iron in the Ghost

Big entrance!


Rock n roll with the wearable Iron Man Mark 43 (XLIII) suit costume.


the Mark 42 XLII color scheme

If you want to purchase the Iron Man Mark 42 suit, please place your order through the Mark 43's product page and leave a note to state you want the Mark 42 painting.


the Mark 4 IV color scheme

If you want to purchase a wearable Iron Man suit in this color design, please place your order through the Mark 43's product page and leave a note to state you want the Mark 4 painting.

If you want to purchase a wearable Iron Man suit in this color design, please place your order through the Mark 43's product page and leave a note to state you want the black and white painting.


Photos from our customers

wearable Iron Man Suit Mark 43 armor costume customer 1

wearable Iron Man Suit Mark 43 armor costume customer 2

wearable Iron Man Suit Mark 43 armor costume customer 3


Control System

The master switch, inside the chest armor. Turn on before you put on the chest armor. It controls the following add-ons.

  • general electronic control board
  • 2 Hand lights
  • refined Chest Arc Reactor light
  • blue lights under the chest armor


Left hand triggers, beside the left index finger. Controlled by your left thumb. They control the following add-ons.

  • L1: helmet face plate and eye lights
  • L2: left Refined Hand Repulsor


Right hand triggers, beside the right index finger. Controlled by your right thumb. They control the following add-ons.

  • R1: flying stabilizer & Carbon Dioxide (CO2) powered propulsion simulators
  • R2: right Refined Hand Repulsor 


Left forearm button. Controlled by your right hand. It controls the following add-on.

  • L3: left forearm missile


Right forearm button. Controlled by your left hand. It controls the following add-on.

  • R3: right forearm missile


Left / right shoe armor switch control, beneath the shoe protector. Turn on before you put on the shoe armors. They control the following add-ons.

  • L4 / R4: left / right shoe bottom lights


Harness System

Generally speaking, after you get familiar with the structure, you will only need about 30 minutes to put on the armor.

Important: You are not able to put on the armor without someone else to help you.

The armor can be divided into the following wearing units (sorted by wearing sequence):

  • thighs & legs
  • shoes
  • belly & crotch
  • helmet & neck
  • chest & back
  • arms
  • gauntlets (hands)


Special Edition

If you want to purchase the wearable Iron Man suit in this color design, please place your order through the Mark 43's product page and leave a note to state you want the black and gold painting.

[Special Edition] Black Gold Wearable Iron Man Suit Mark 43 XLIII Armor Costume  1

[Special Edition] Black Gold Wearable Iron Man Suit Mark 43 XLIII Armor Costume  2

[Special Edition] Black Gold Wearable Iron Man Suit Mark 43 XLIII Armor Costume  3

[Special Edition] Black Gold Wearable Iron Man Suit Mark 43 XLIII Armor Costume  4


Photos

Wearable Iron Man Mark 43 (XLIII) suit costume full body front

Wearable Iron Man Mark 43 (XLIII) suit costume full body front2

Wearable Iron Man Mark 43 (XLIII) suit costume full body side

Wearable Iron Man Mark 43 (XLIII) suit costume full body side1

Wearable Iron Man Mark 43 (XLIII) suit costume full body side2

Wearable Iron Man Mark 43 (XLIII) suit costume full body back

Wearable Iron Man Mark 43 (XLIII) suit costume prototype upper DSLR front2

Wearable Iron Man Mark 43 (XLIII) suit costume prototype upper DSLR front

Wearable Iron Man Mark 43 (XLIII) suit costume prototype upper DSLR side

Wearable Iron Man Mark 43 (XLIII) suit costume prototype upper DSLR front3

Wearable Iron Man Mark 43 (XLIII) suit costume prototype upper DSLR side2

Wearable Iron Man Mark 43 (XLIII) suit costume prototype upper DSLR back

vision Iron Man Mark 43 (XLIII) suit costume

the Wearable Iron Man Mark 43 (XLIII) suit costume finished


In the Movie

The Iron Man Mark 43 (XLIII) armor made its debut in the movie Avengers: Age of Ultron. The Mark 43's color design is featuring more red plates than gold and the red having a darker hue, which is different from that of its predecessor, Mark 42.

Much like the Mark 42, the Iron Man MK 43 armor has the prehensile function which allows Tony Stark to call and wear the armor by doing a certain gesture and posture. And just like the Mark 42 and mark 41 it can fly in separate pieces.

A new feature of the Iron Man Mark 43 armor is Sentry Mode, allowing the armor to move on its own without Tony inside of it. Another feature is Infared Scan, that allows Stark to see through walls.


History

(cited from wikia)

Before the Age of Ultron

Creation

Sometime after the Battle of Norco, Tony wanted to perfect the prototype version of his late Mark 42 armor. So he presumably took the former suit's blueprints and began working on a new design for the 42's successor.

Overtime, the armor was built and eventually finished. Based on it's predecessor, the armor was very similar in appearance to 42, with slight changes in a few armors, and the brand new color scheme; featuring dark red as the predominant color with golden plates.

Avengers: Age of Ultron

Raiding the HYDRA Base

Tony used the Mark 43 in their mission to raid HYDRA's Base located in Sokovia, together with the Avengers. When the team arrived, a battle ensued between both sides as Baron Strucker pushed his HYDRA's forces against the Avengers. During the raid Tony took out countless HYDRA forces with the Mark 43, firing it's Repulsors against them and using hand-to-hand combat, punching and throwing soldiers around for the other Avengers to take care of.

Wakanda and Duel Against Ultron

After Tony Stark realizing Ultron's plan, without haste, he travelled Wakanda, Africa along with the Avengers. in a ship, containing supplies of vibranium supplied by Ulysses Klaw, Iron Man had his first confrontation of Ultron Prime, he asked what was the vibranium Ultron wants for, yet Ultron took this chance "to explain his evil plan". A fight emerges, yet taken outside the ship where they met, and continued their battle on the sky, while the remaining Avengers except Hulk try to defeat their new foes (turned allies), Wanda and Pietro Maximoff.

Surely, the remaining Avengers were overpowered by the twins, except Hawkeye was the only one not taken down. Iron Man, unaware of the defeated Avengers, had finally taken down Ultron on a seashore, aiming his signature tank missile at him. However, ultron told him that "he might have check on Doctor Banner", realizing that the Scarlet Witch had made the Hulk go on a rampage. Iron Man, mad at Ultron, shot his tank missile at him and flew away as Ultron explodes.

Transforming Into the Mark 44

When the Hulk went on a rampage, Tony called in Veronica, which was launched from a satellite in orbit and sent towards South Africa. The pod activated, and armor pieces detached and flew towards the Mark 43. The Mark 43 underwent it's transformation into the Mark 44 in mid-air as the armor add-ons attached themselves on the base armor.

When the transformation was complete, the Mark 43 now within the Mark 44 arrived to confront the Hulk who just escaped not moments ago from a specialized Hulk Cage, which also came from Veronica.

From then on the Mark 43 continued action within the Mark 44 armor until the end of the chaotic battle.

Having trouble in purchasing?
Purchase the suit by email now
wearable mark 43 suit Customizing the The New Wearable Mark 43 (XLIII) Suit Costume

< Back to the description

< back
Measurements
  • Measurements 
    Basic Measurements

    Save your measurements for future use, save $50 right now!

    You are one step away from the ultra-realistic wearable Iron Man costume suit!

    Basic information collapse all
    [?] [?]
    How to measure Bare Foot Stand Height?

    [?]

    Take off shoes and remove anything on your head (besides hair). Stand with your back against the wall with your feet together. Make your body as straight as possible.
     
    [?] [?]
    How to measure your Weight?

    [?]

    Remove your shoes and heavy clothing.
     
    For helmet collapse all
    [?] [?]
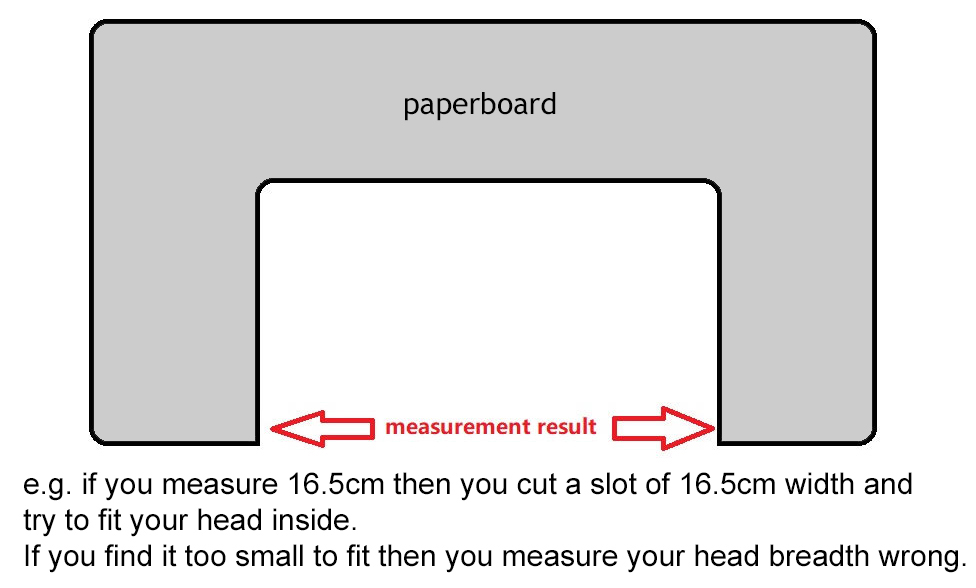
    How to measure your Head Breadth?

    [?]

    We need your head breadth NOT your head circumference.

    Step 1:
    Stand against a wall and put two books above the top edge of your ears, move closer the books until they tightly reach your head sides. You need someone else to help you.

    Step 2:
    Now you can walk away from the wall but please keep the books unmoved. Measure the distance between the two books to get your head breadth.

    Notice:

    • If you have thick hair in the side of your head, you NEED to take it into consideration.
    • If you wear eye glasses, you NEED NOT to take them into consideration.
    • Take several measurements to see if you get the same results and to make sure you have done it correctly.

    You can also make sure the measurement with a paperboard. Simply cut a slot on it with the same width with the measurement result, and if it can be fit on your head it means the measurement is correct.

    confirm your head breadth?
     
    For gauntlets (hand armors)collapse all
    Finger length
    [?] [?]
    How to measure your Little finger length?

    [?]

    Please measure from the tip of your each finger to where the finger connects to the palm of your hand (specifically, measure to the crease between palm and finger, indicated on the diagram).

     
    [?] [?]
    How to measure your Ring finger length?

    [?]

    Please measure from the tip of your each finger to where the finger connects to the palm of your hand (specifically, measure to the crease between palm and finger, indicated on the diagram).

    For thumb finger length best results:

    • Use a straight edge, solid ruler not a measuring tape Let your thumb finger curl naturally
    • Fine the crease between Palm and thumb as indicated on diagram
    • Start your measurement at the crease by placing the start of the ruler at the indicated crease
    • Straighten your thumb along the ruler
    • Determine and record the length of your thumb

     
    [?] [?]
    How to measure your Middle finger length?

    [?]

    Please measure from the tip of your each finger to where the finger connects to the palm of your hand (specifically, measure to the crease between palm and finger, indicated on the diagram).

    For thumb finger length best results:

    • Use a straight edge, solid ruler not a measuring tape Let your thumb finger curl naturally
    • Fine the crease between Palm and thumb as indicated on diagram
    • Start your measurement at the crease by placing the start of the ruler at the indicated crease
    • Straighten your thumb along the ruler
    • Determine and record the length of your thumb

     
    [?] [?]
    How to measure your Index finger length?

    [?]

    Please measure from the tip of your each finger to where the finger connects to the palm of your hand (specifically, measure to the crease between palm and finger, indicated on the diagram).

    For thumb finger length best results:

    • Use a straight edge, solid ruler not a measuring tape Let your thumb finger curl naturally
    • Fine the crease between Palm and thumb as indicated on diagram
    • Start your measurement at the crease by placing the start of the ruler at the indicated crease
    • Straighten your thumb along the ruler
    • Determine and record the length of your thumb

     
    [?] [?]
    How to measure your Thumb finger length?

    [?]

    Please measure from the tip of your each finger to where the finger connects to the palm of your hand (specifically, measure to the crease between palm and finger, indicated on the diagram).

    For thumb finger length best results:

    • Use a straight edge, solid ruler not a measuring tape Let your thumb finger curl naturally
    • Fine the crease between Palm and thumb as indicated on diagram
    • Start your measurement at the crease by placing the start of the ruler at the indicated crease
    • Straighten your thumb along the ruler
    • Determine and record the length of your thumb

     
    Finger knuckle breadth
    [?] [?]
    2nd knuckle breadth of little finger width measurements

    [?]

    Please measure the width of the 2nd knuckle of your finger, as indicated in the diagram.

    For thumb finger, please measure the width of the only knuckle, as indicated in the diagram.

     
    [?] [?]
    2nd knuckle breadth of middle finger width measurements

    [?]

    Please measure the width of the 2nd knuckle of your finger, as indicated in the diagram.

    For thumb finger, please measure the width of the only knuckle, as indicated in the diagram.

     
    [?] [?]
    knuckle breadth of thumb finger width measurements

    [?]

    Please measure the width of the 2nd knuckle of your finger, as indicated in the diagram.

    For thumb finger, please measure the width of the only knuckle, as indicated in the diagram.

     
    Palm
    [?] [?]
    How to measure your Palm width?

    [?]

    Please measure across the widest part of your palm (between the starting points of the palm print). These point can best be determined by the using the natural lines on your hands as reference points as indicated by the line highlighted in the diagram. To see these lines clearly, relax your hand while measuring.

     
    For shoes collapse all
    [?] [?]
    Shoe Size Chart

    [?]

    The shoe armors have a pair of built-in shoes.

    The shoe armors have 5 sizes (S, M, L, XL and XXL) corresponding to your normal shoes size.

    Notice:

    If your shoes have different sizes, the small size shall prevail (For example, if you wear shoes of size 42 and 43, your shoe size is “M”).

    SizeEUUSCAUKAUMXJP
                   
    S <=37            
    37 5.5 5.5 5   - 23.5
    38 6 6 5.5   25 24
    39 6.5 - 7.0 6.5 - 7.0 6 - 6.5   - 24.5
    M 40 7.5 7.5 7   26 25-25.5
    41 8 8 7.5   27 26
    42 8.5 8.5 8 8.5 28 26.5-27
     L 43 9 - 9.5 9 - 9.5 8.5 - 9 9 29 27.5-28
    44 10 10 9.5 10.5 30 28.5
     XL 45 10.5 - 11 10.5 - 11 10 - 10.5 11.5 - 29
    46 11.5 11.5 11.5 12 31 30
    XXL  47 12.5 12.5 12.5 12.5 - 13 32 31
    >=47            
     
    For body collapse all
    [?] [?]
    Body circumference

    [?]

    Neck Circumference

    There are two methods of determining your neck circumference:  Method 1: Simply measure the circumference around the thickest part of your neck as indicated on the diagram.  Method 2: Measure around the lower part of the neck.

    Chest Circumference

    Place a tape measure under your armpits and put it around the fullest part of your chest. Make sure the tape measure isn't too loose or too tight.

    Waist Circumference

    Put a tape measure around your BELLY BUTTON. Don’t suck your stomach. Make sure the tape measure isn't too loose or too tight.

    Hip Circumference

    Wrap the tape measure around the WIDEST part of your hips and make sure it isn't too loose or too tight.

    Thigh Circumference

    Do this measurement as high up your thigh as possible. Wrap the tape measure around ONE of your thigh. Make sure the tape measure isn't too loose or too tight.

    Calf Circumference

    Do this measurement around the widest part of your calf as indicated by the red line in the diagram. Wrap the tape measure around ONE of your calf. Make sure the tape measure isn't too loose or too tight.

    Axillary Arm Circumference

    Wrap the tape measure around your arm above the bicep and underneath the axilla or armpit and make sure it isn't too loose or too tight.

     
    <  back
     
  • Basic Add-ons 
    Basic Add-ons
    Add-on optionscollapse all
    •  
      I need this.+$249No, thanks.I need this.+$249No, thanks.
      Motorized face plate and eye lights

      [?]

      There is no doubt that this is the must-have iconic feature of the Wearable Iron Man armor suit. When the face plate is closed the eye lights will quickly blink three times and then illuminate steady white light. And when the face plate is opened the eye lights will be off.

      Related FAQ

      Q: Can I still see outside when the face plate is down and the eye lights are on?

      A: Yes, you can see what and who is in front of you so you can walk without running into something.

    •  
      I need this.+$349No, thanks.I need this.+$349No, thanks.
      Refined Chest Arc Reactor light

      [?]

      The refined chest Arc Reactor contains a LED light plate and an exterior detraction layer made of aluminum alloy, copper, acrylic and ABS.

    •  
      I need this.+$349No, thanks.I need this.+$349No, thanks.
      Hand Repulsors / Lights

      [?]

      Refined Hand Repulsors with sound effect

      Once activated, the light intensity of the Repulsors will increase to a peak then dim to normal level along with the sound effect just like that in the movie. The left and the right Refined Hand Repulsors are separately controlled.

    +$299
    +$499
    < back
     
     
  • Advanced Add-ons 
    Advanced Add-ons
    Add-on optionscollapse all
    •  
      I need this.+$99No, thanks.I need this.+$99No, thanks.
      Blue lights under the chest armor

      [?]

      Simple but sexy. Once turned on the 6 LED beads will generate blue light reflecting over the belly armor to create a technological aesthetic feeling.

      Related FAQ

      Q: Do you think I should take this add-on?

      A: Why not?

    •  
      I need this.+$299No, thanks.I need this.+$299No, thanks.
      2 Shoe bottom lights

      [?]

      In the movie, the Iron Man suit achieves sustained flight using both the Repulsors on its hands and under the shoes.

      The shoe bottom lights are mounted under the bottom of the shoe armors and protected by a steel frame structure around the lights with a layer of acrylic glass.

      New feature: walking sound effects on each step.

    •  
      I need this.+$99No, thanks.I need this.+$99No, thanks.
    •  
      I need this.+$99No, thanks.I need this.+$99No, thanks.
      Voice command control and voice changer

      [?]

      With the voice command control, you can easily summon J.A.R.V.I.S. to activate or deactivate the electronic system and add-ons of your suit. What's more, you can have conversations with him like in the movies.

      The voice changer aims to simulate the sound effect that comes through the real Iron Man helmet just like that in the movies. There is an audio amplifier for the voice changer and a volume control so you can speak normally but people can hear you loud.

    [?]
     
    please select
    • Both forearms $599
    • Left forearm $299
    • Right forearm $299
    • No, thanks.
     
     
    Forearm missile

    [?]

    Once activated, the two cover armors of the Laser Plasma Gun will open and slide to left and right side. Then a hidden missile and a red laser pointer will raise up and forward to ready-to-launch status. When deactivated, both the missile and the laser pointer will retract to the hidden chamber.

     
    •  
      I need this.+$799No, thanks.I need this.+$799No, thanks.
      Flying Stabilizer

      [?]

      We designed 4 motorized wing flaps in the back of the wearable Iron Man Mark 43 suit. Once activated, they will open to expose the interior chromic armor with four blue LED lights housed beneath.

    •  
      I need this.+$499No, thanks.I need this.+$499No, thanks.
      Carbon Dioxide (CO2) Jet Simulators

      [?]

      After the motorized back wing flaps opened, the Carbon Dioxide (CO2) jet simulators, which are housed and hidden beneath the lower 2 wing flaps, will then emit short bursts of visible CO2.

      Dry ice (Carbon Dioxide in solid status) is required for CO2 generation. We designed a simple door structure in the back of the armor so you can open it and add dry ice. This is the coolest add-on we have ever built - very good presentation effect and much safer than the compressed CO2 vessel.

      You can choose to buy both the motorized back wing flaps and the CO2 jet simulator or only the motorized wing flaps.

    < back
     
     
  • Accessories 
    Accessories
    Accessories optionscollapse all
    [?]
     
    please select
    • Scarlet red $99
    • No, thanks.


    [?]

    Our Specially designed bodysuit covers the entire body except the face. There is a zipper in the back for you to put on and off the suit and a zipper under the crotch for you to go to the bathroom.

    The Height-increasing shoe insoles add more length to your legs so you will have a better overall visual presentation after you put on your armor costume.

     
    [?]
     
    please select
    • Black color $649
    • Original Aluminium color $549
    • No, thanks.


    [?]

    You can use a UAAS to store and exhibit your armor costume when you are not wearing it.

    Universal Aluminium Alloy Support (UAAS) for All Our Armor Costumes is Available Now 1 Universal Aluminium Alloy Support (UAAS) for All Our Armor Costumes is Available Now 2 Put a Iron Man Mark II 2 Armor Costume on to a Universal Aluminium Alloy Support (UAAS) 1 Put a Iron Man Mark II 2 Armor Costume on to a Universal Aluminium Alloy Support (UAAS) 2 Put a Iron Man Mark II 2 Armor Costume on to a Universal Aluminium Alloy Support (UAAS) 3 Put a Iron Man Mark II 2 Armor Costume on to a Universal Aluminium Alloy Support (UAAS) 4 Put a Iron Man Mark II 2 Armor Costume on to a Universal Aluminium Alloy Support (UAAS) 5

     
    < back
     
     
  • Note 
    Note
    Additional Note
     
    < back
     
     
Go back
Total cost
$5,999
as configured
Advance payment $500
Shipping worldwide
Qty1
Please confirm your measurements first.

If you encounter any trouble proceeding to the shopping cart, please contact administrator@buyfullbodyarmors.com

 
Review Your Customization close

Total cost

Total savings$0

Shipping worldwide

Standard shipping date before April 18th, 2015

PayPal is our preferred payment method.

Click options to edit.X

Bare foot stand height
Weight
Head breadth
Neck circumference
Chest circumference
Waist circumference
Hip circumference
Axillary arm circumference
Thigh circumference
Calf circumference
Shoes size chart
Little finger length ("pinky finger")
Ring finger length
Middle finger length
Index finger length
Thumb finger length
Palm Width
 
Motorized Face Plate & Eye Lights
Ultra-refined chest Arc Reactor
Ultra-refined hand Repulsors with sound effect
 
Spandex body suit + Height-increasing shoe insoles
Universal Aluminium Alloy Stand (UAAS) with external power supply
 
Add-on options
Blue Lights under the Chest Armor
Ultra-refined shoe bottom Repulsors with walking sound effect
Ventilation cooling system
Voice Changer
Forearm Missile
Motorized back wing flaps
Carbon Dioxide (CO2) powered propulsion simulators
 
Additional Note
 
 
J.A.R.V.I.S is loading... J.A.R.V.I.S is loading...


Customize & Buy
↑ top
have questions or concerns? contact us.

administrator@buyfullbodyarmors.com